By now, many of us may be familiar with text-to-image models like Midjourney, DALL·E 3, StableDiffusion etc., Recently, I came across an interesting project called Visual Anagrams that utilizes text-to-image model to generate picture illusions. This project enables us to input two different text prompts, and the model generates pictures that match the prompts under various transformations, such as flips, rotations, or pixel permutations. Growing up, I had a nerdy fascination with illusions and ambigrams, so I was thrilled to give this a try.
 |  |  |
 |  |  |
 |  |  |
DeepFloyd IF Model: Memory Requirements and Optimization
Behind the scenes, Visual Anagrams utilizes the DeepFloyd IF model, which takes a unique approach to Stable diffusion. Unlike StableDiffusion which performs denoising in a latent space, DeepFloyd IF operates directly in the pixel space. This approach enables the model to better align with text and generate legible images, addressing a challenge faced by Stable Diffusion.
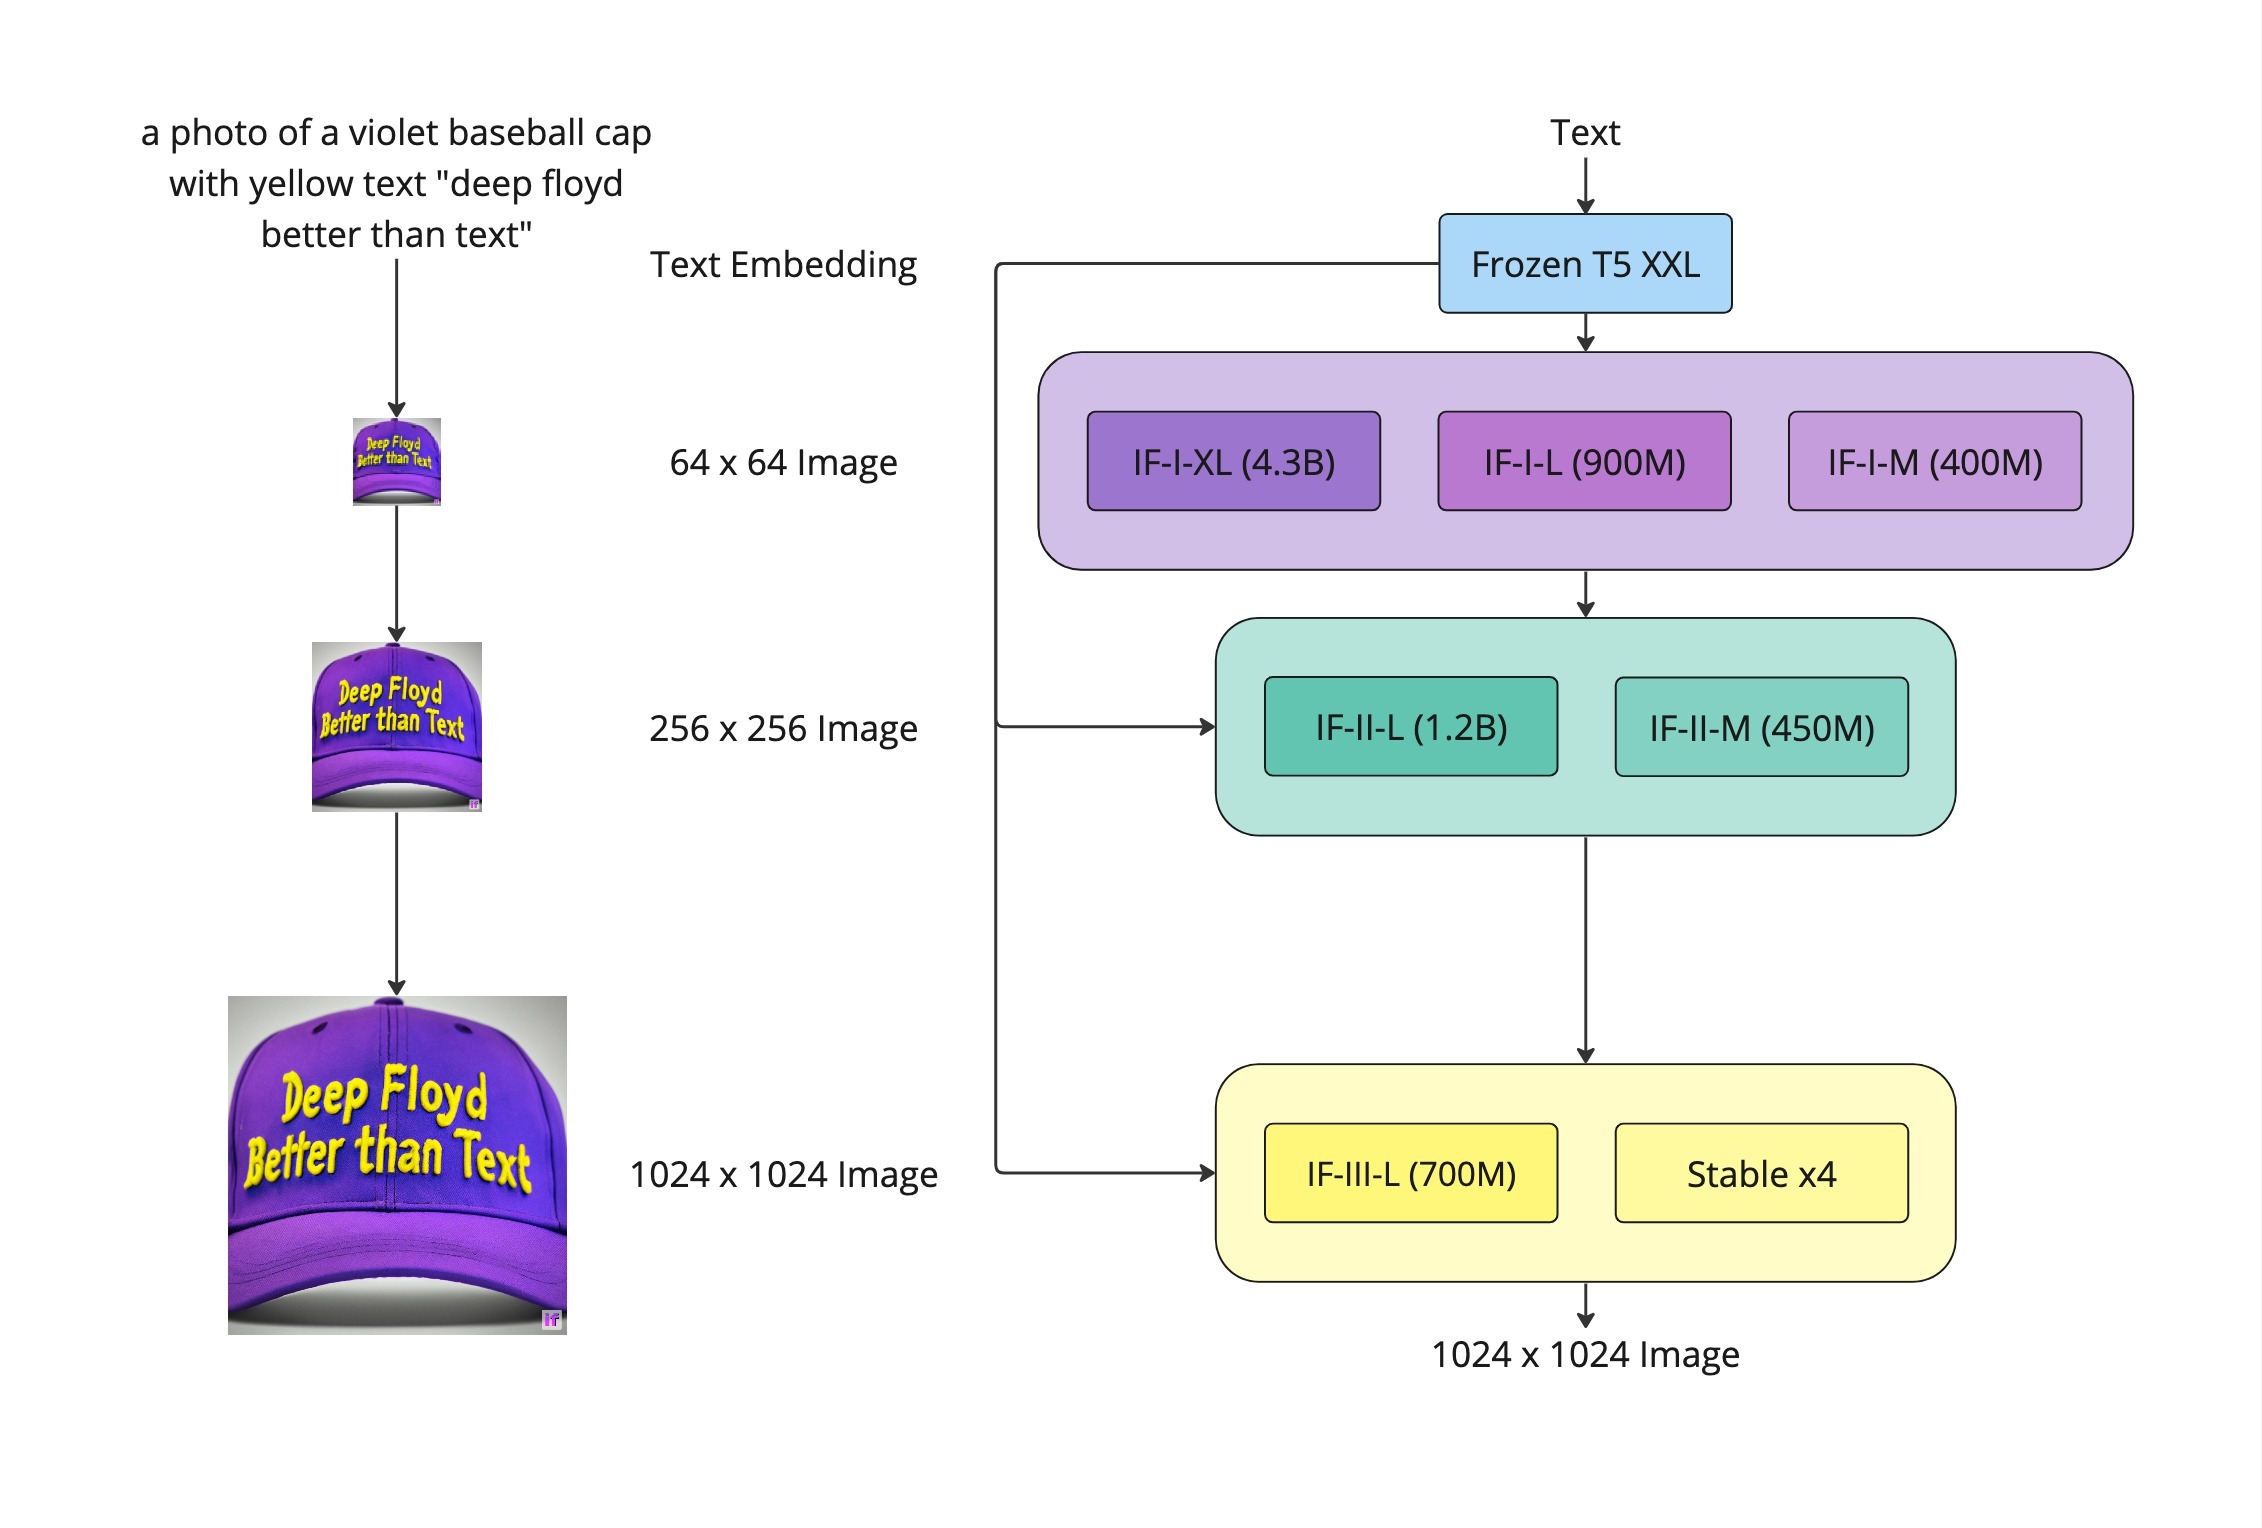
However, these advantages come at a cost of significantly higher memory requirements. DeepFloyd IF is a modular model composed of a frozen text encoder and three cascaded pixel diffusion modules. Running the model in full float32 precision would require at least 37GB of memory.
 Source: DeepFloyd-IF model card
Fortunately, it is possible to run this model on Google Colab or even on consumer hardware for free. The Diffusers API from HuggingFace allows us to load individual components modularly, reducing the memory requirements by loading components selectively.
Inference process
Import and setup what we need
First let us install the dependencies and a copy of visual anagrams repo.
! pip install -q
    diffusers
    transformers
    safetensors
    sentencepiece
    accelerate
    bitsandbytes
    einops
    mediapy
    accelerate

!pip install -q git+https://github.com/dangeng/visual_anagrams.git
Load TextEncoder Model
The TextEncoder model used in DeepFloyd-IF is T5. To begin, we load this T5 model in half-precision (fp16) and utilize the device_map flag to enable transformers to offload model layers to either CPU or disk. This reduces the memory requirements by more than half. For more information on device_map, refer to the transformers documentation.
from transformers import T5EncoderModel

text_encoder = T5EncoderModel.from_pretrained(
    "DeepFloyd/IF-I-L-v1.0",
    subfolder="text_encoder",
    device_map="auto",
    variant="fp16",
    torch_dtype=torch.float16,
)
Addendum
To further reduce memory utilization, we can also load the same T5 model using 8-bit quantization. Transformers directly supports bitsandbytes through the load_in_8bit flag. Set the variant=“8bit” flag to download pre-quantized weights. This allows loading the text encoders in as little as 8GB of memory.
Create text embeddings
Next, we need to generate embeddings for the two prompts that describe the visual illusions. DiffusionPipeline from HuggingFace Diffusers library contains methods to load models necessary for running diffusion networks. We can override the individual models used by changing the keyword arguments to from_pretrained. In this case, we pass the previously instantiated text_encoder for the text_encoder argument and None for the unet argument to avoid loading the UNet into memory, enabling us to load only the necessary models to run the text embedding portion of the diffusion process.
from diffusers import DiffusionPipeline

pipe = DiffusionPipeline.from_pretrained(
    "DeepFloyd/IF-I-L-v1.0",
    text_encoder=text_encoder, # pass the previously instantiated text encoder
    unet=None
)
We can now use this pipeline to encode the two prompts. The prompts need to be concatenated for the illusion.
# Feel free to change me:
prompts = [
      'an oil painting of a deer',
      'an oil painting of a waterfall',
    ]

# Embed prompts using the T5 model
prompt_embeds = [pipe.encode_prompt(prompt) for prompt in prompts]
prompt_embeds, negative_prompt_embeds = zip(*prompt_embeds)
prompt_embeds = torch.cat(prompt_embeds)
negative_prompt_embeds = torch.cat(negative_prompt_embeds)  # These are just null embeds
Flush to free memory for the next stages.
import gc

def flush():
    gc.collect()
    torch.cuda.empty_cache()

del text_encoder
del pipe
flush()
Main Diffusion Process
With the available GPU memory, we can reload the DiffusionPipeline using only the UNet to execute the main diffusion process. Note that once again we are loading the weights in 16-bit floating point format using the variant and torch_dtype keyword arguments.
from diffusers import DiffusionPipeline

stage_1 = DiffusionPipeline.from_pretrained(
    "DeepFloyd/IF-I-L-v1.0",
    text_encoder=None,
    variant="fp16",
    torch_dtype=torch.float16,
)

stage_1.enable_model_cpu_offload()
stage_1.to('cuda')
stage_2 = DiffusionPipeline.from_pretrained(
                "DeepFloyd/IF-II-L-v1.0",
                text_encoder=None,
                variant="fp16",
                torch_dtype=torch.float16,
              )
stage_2.enable_model_cpu_offload()
stage_2.to('cuda')
Generate Image
Choose one of the view transformations supported by the Visual Anagrams repository.
from visual_anagrams.views import get_views
# UNCOMMENT ONE OF THESE

# views = get_views(['identity', 'rotate_180'])
# views = get_views(['identity', 'rotate_cw'])
# views = get_views(['identity', 'flip'])
# views = get_views(['identity', 'jigsaw'])
views = get_views(['identity', 'negate'])
# views = get_views(['identity', 'skew'])
# views = get_views(['identity', 'patch_permute'])
# views = get_views(['identity', 'pixel_permute'])
# views = get_views(['identity', 'inner_circle'])
Results
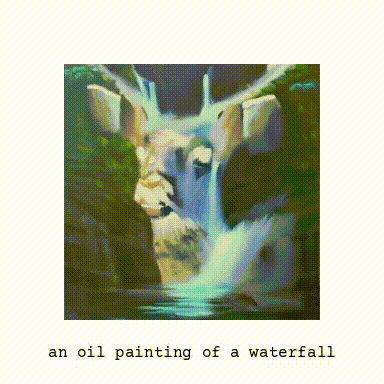
Now, we are ready to generate the visual illusions. The sample_stage_1 function from visual anagrams repo accomplishes this and produces a $64 \times 64$ image. Similarly, the sample_stage_2 function upsamples the resulting image while denoising all views, generating a $256 \times 256$ image.
from visual_anagrams.samplers import sample_stage_1, sample_stage_2
from visual_anagrams.utils import add_args, save_illusion, save_metadata
image_64 = sample_stage_1(stage_1,
                          prompt_embeds,
                          negative_prompt_embeds,
                          views,
                          num_inference_steps=40,
                          guidance_scale=10.0,
                          reduction='mean',
                          generator=None)
mp.show_images([im_to_np(view.view(image_64[0])) for view in views])
image = sample_stage_2(stage_2,
                       image_64,
                       prompt_embeds,
                       negative_prompt_embeds,
                       views,
                       num_inference_steps=30,
                       guidance_scale=10.0,
                       reduction='mean',
                       noise_level=50,
                       generator=None)
mp.show_images([im_to_np(view.view(image[0])) for view in views])
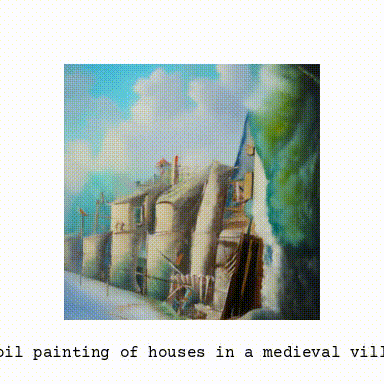
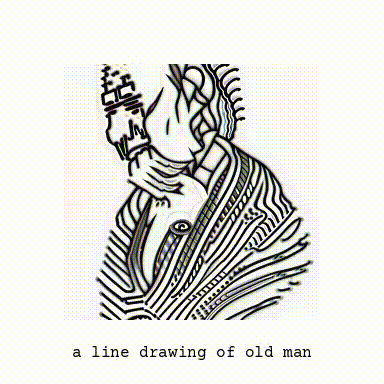
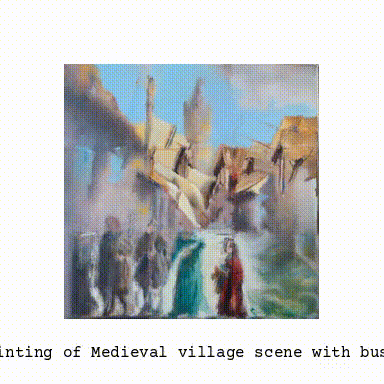
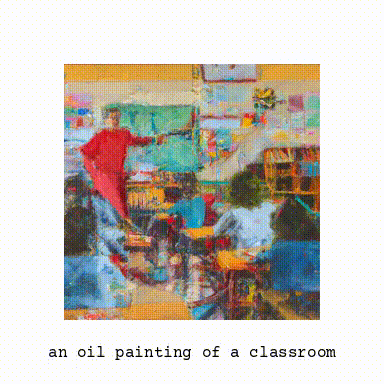
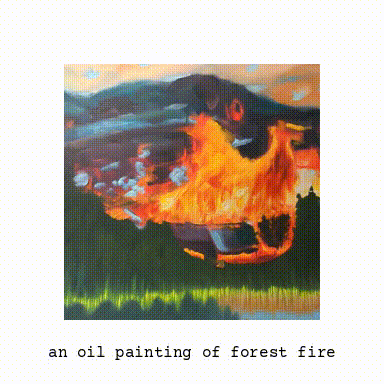
More Examples
Here are few more examples of illusions generated using this model.
|
Conclusion
With this, we get a pretty impressive image of a waterfall which when inverted looks like a deer. I have a notebook version of the same code, you can give it a try in colab and try different transformation views. It is fascinating to observe how details from different objects and scenes can be embedded into a picture and how our visual apparatus end up seeing what we want to see.