When it comes to creating artwork, there are many Generative AI tools, but my favorite one is the vanilla Stable Diffusion. Since it is open source, an ecosystem of tools and techniques have sprouted around it. With it, you can train your own model, fine-tune existing models, or use countless other models trained and hosted by others.
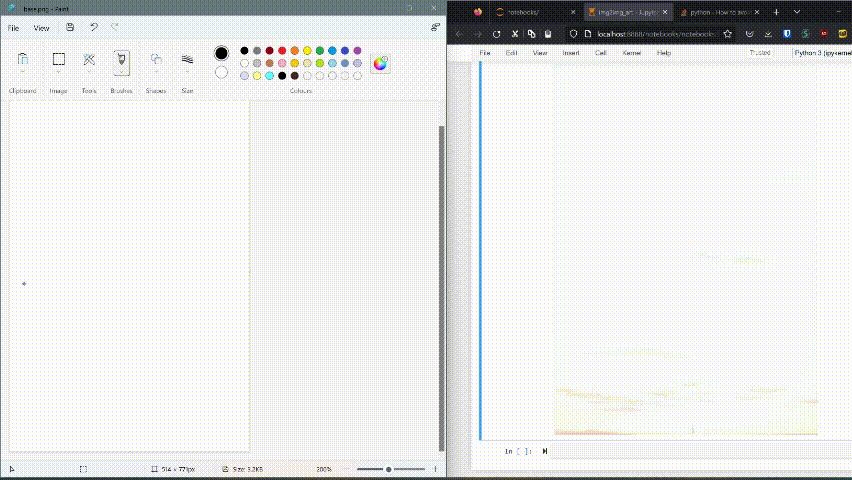
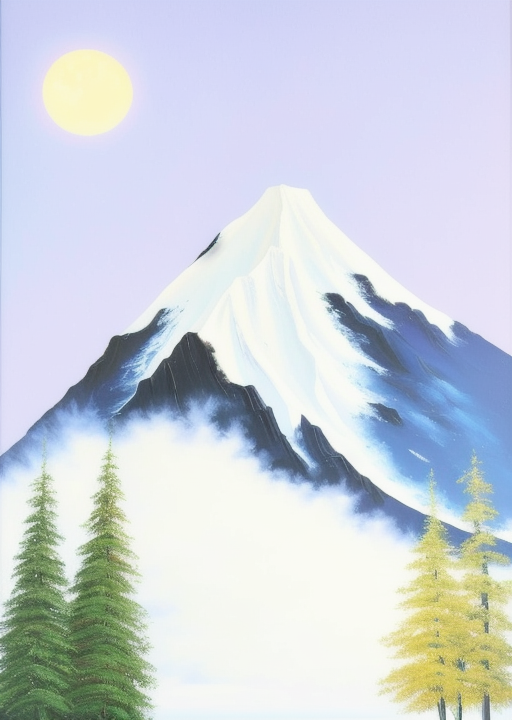
But one of my favorite use case is to render rough sketches into much prettier artwork. In this post we will see how to setup real-time rendering so that we have an interactive drawing experience. See below to see how quickly we can come up with a decent painting.
This was just a rough draft done in 2 minutes, with a bit more skill and persistence it is possible to extract a more beautiful artwork as per your want.
What I like about this approach is that it is interactive - you don’t go in with a pre-conceived notion. You take your artwork to where the canvas (Stable Diffusion in this case) leads you. Next we will see how to set it up on your own.
Instructions
For this, I made use of the excellent Stable Diffusion web UI project by AUTOMATIC1111. The Web UI also supports an API mode which we will use to generate images using img2img feature of Stable Diffusion. img2img uses the weights from Stable Diffusion to generate new images from an input image using StableDiffusionImg2ImgPipeline.
Ideally you would require a GPU with more than 8GB VRAM. There are workarounds to run the model on lower end GPUs. Refer to AUTOMATIC1111 docs or wiki for more details.
Setup
- Install Stable Diffusion Web UI by following the instructions in the project page. If you are on Windows, I would recommend running this directly on Windows rather than on WSL2. Navigating CUDA runtime dependencies across Windows + linux is not worth the time.
- We would also need Jupyter notebook and webuiapi packages to call Stable Diffusion Web UI API. At launch, AUTOMATIC1111 always sets up a VirtualEnv and pip installs the packages from
requirements.txt. So add the packagesnotebookandwebuiapito the bottom ofrequirements.txtpresent at the project root. Jupyter notebook package will get installed at the next launch. - Next we need to enable API support. For example, if you’re using Windows, edit the
webui-user.batfile and add –api –api-log to the COMMANDLINE_ARGS line:
set COMMANDLINE_ARGS=--api
- Run the modified execution script. For example, on Windows, run
webui-user.bat. It should launch Stable diffusion web UI - In order to run Jupyter notebook, open a separate CMD shell, activate the venv and then launch jupyter notebook
## Activate venv
venv\Scripts\activate.bat

## Run Jupyter notebook
start jupyter notebook
- Verify that Stable Diffusion Web UI is running by visiting http://localhost:7860/ in your browser.
- When you are done, remember to close both the CMD windows.
Drawing
- Open a new notebook and add the following code:
import webuiapi
from IPython.display import clear_output
import os
import time
from pathlib import Path
from PIL import Image

# create API client
api = webuiapi.WebUIApi(sampler='Euler a', steps=20)

file_base = "base.png"
file_prompt = "prompt.txt"
f_base_new = 0
f_prompt_new = 0
- Add your desired prompt text to the file
prompt.txt. In my example above, I used a very generic prompt like below:
an oil painting of a scenery by bob ross
Create a PNG file called
base.pngusing MS Paint or any of your favorite image editing tool and save it at the base path.Run this code from a new cell block in your notebook. It will monitor you files for changes periodically andcall Stable Diffusion web UI API to generate new images based on your updated drawings.
while True:
    f_base = os.path.getmtime(file_base)
    f_prompt = os.path.getmtime(file_prompt)
    if f_base == f_base_new and f_prompt==f_prompt_new:
        time.sleep(0.5)
    else:
        f_base_new = f_base
        f_prompt_new = f_prompt
        prompt_txt = Path(file_prompt).read_text()
        with Image.open(file_base) as im:
            result2 = api.img2img(
                images=[im],
                prompt=prompt_txt,
                negative_prompt = "poorly drawn, photorealistic, watermark, logo, text, bad anatomy, missing fingers,missing body part,mangled hands, NSFW",
                steps=40,
                seed=-1,
                styles=[],
                cfg_scale=7,
                width=512,
                height=724,
                denoising_strength=0.6)
            clear_output(wait=True)
            display(result2.image)
- Draw some rough strokes and watch stable-diffusion interpret and render it as a painting. Each rendering may take few seconds depending on the GPU configuration.
- You will have to save the file periodically to trigger the
img2imginference. If you are using a tool like Photoshop, you can turn on autosave.