This post is a gentle introduction to networking with Openstack using the Neutron module. Being an introduction, we will not focus on setting up OpenStack from scratch. Instead we will familiarize ourselves with core concepts of Neutron and common administrative tasks. We will use the latest release of Openstack, Queens.
For ease of setup, we will make use of pre-packaged Devstack environment. Devstack is a set of scripts from official OpenStack community that allows us to quickly build an Openstack instance with latest versions of all modules. It is very useful for testing and training purposes.
Neutron Concepts
Let us go through the important terms first:
Network - A Network is a logical container of entities. To think of it in physical networking terms, it can represent a site, a DC, a campus- or anything else termed as a single network. In AWS terms, a network is similar to a VPC. Note that the definition of a Network is not entirely arbitrary as we may encounter some design choices when deciding CIDR, load balancers, routers, external gateway etc.,
Subnet - Subnet is similar to a vlan in traditional networking. All hosts in the same Subnet can talk to each other and share the same address space. For beginners, it is possible to confuse a Subnet with Network since both terms are used interchangeably in traditional networking. But keep in mind that one network can contain many subnets. The concept of a Subnet is similar both in OpenStack and AWS.
Port - A port is a virtual NIC card which is used by resources to access network. A port is tied to a subnet and assigned with a Security group (introduced below). In AWS terms, it is similar to ENI (Elastic Network Interface)
Security Group - Security groups are like port ACL in traditional networking, except that the filtering happens at the hypervisor level. Multiple ports can share the same security group. By default, entities assigned to the same Security Group can talk to each other. It is also similar in scope and function to the Security Group in AWS.
Floating IP - This is similar to elastic IP in AWS. These are not tied to any port and can be re-assigned to other ports dynamically. The closest feature in traditional networking would be a static NAT. In AWS terms, it is called Elastic IP.
Objective
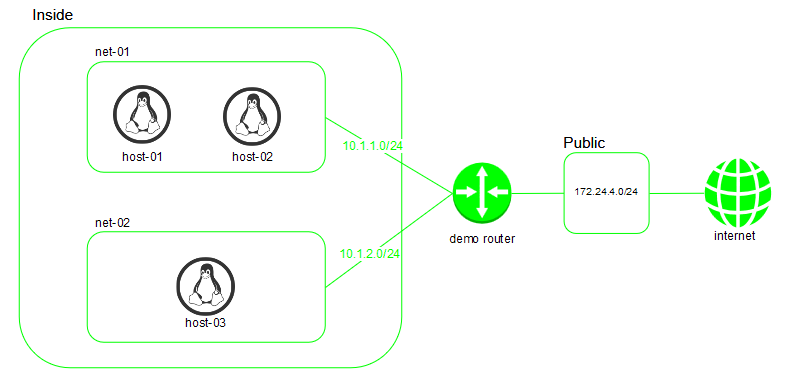
We will create the below topology on Openstack. Hosts host-1 & host-2 will be on same subnet while host-3 will be on another subnet. We will enable reachability between all 3 hosts. Finally, we will also enable bi-directional connectivity to host-1 from internet.
Preparing the environment
Make home directory for our devstack installation and download the latest copy of DevStack there. I am using Ubuntu 16.04 for my environment.
$ sudo mkdir -p /opt/stack && cd /opt/stack
$ sudo git clone https://git.openstack.org/openstack-dev/devstack
Switch to devstack folder and create a user account using the pre-built script. The script grants passwordless root privilege to this account. Switch to the stack account to proceed with rest of the steps.
$ cd devstack
$ sudo bash tools/create-stack-user.sh
Switch to stack user and create a config file. Provide your preferred password which will be used for rest of the setup. The local.conf should be present in the root directory of devstack (same location as stack.sh)
$ sudo su stack
$ vi local.conf
[[local|localrc]]
ADMIN_PASSWORD=password
DATABASE_PASSWORD=$ADMIN_PASSWORD
RABBIT_PASSWORD=$ADMIN_PASSWORD
SERVICE_PASSWORD=$ADMIN_PASSWORD
Run the setup script stack.sh and watch the magic happen. It takes a while since the script installs almost every component of Openstack.
./stack.sh
DevStack also provides convenient script to tear down the environment and start from scratch. So once we are done with our testing, we can run
unstack.shto bring the environment back to a blank state.
After the installation is complete, source the openrc file to import openstack commands in your searchpath.
source openrc
Building subnets
Before we create new subnets, let us list the set of pre-built subnets that were setup as part of devstack deployment.
  stack@openstack-instance-2:~/devstack$ openstack network list -f yaml
  - ID: 1fe4e71c-d94e-400c-bcee-8067b621c827
    Name: public
    Subnets: c0718110-7493-46bf-ba48-720762e47934, fab15575-ae4f-4528-bf0d-ac40d2000484
  - ID: 2ebe2084-6dae-40dd-8704-7954944238d7
    Name: private
    Subnets: 244ed014-8b9f-4e4d-ab12-9931ecec4238, 265de598-d881-4d58-a185-1a69be39b2fd
The default output format is table. To simplify horizontal scrolling, I have selected yaml output using the -f switch.
Create a new network called inside.
  stack@openstack-instance-2:~/devstack$ openstack network create inside
  +---------------------------+--------------------------------------+
  | Field                     | Value                                |
  +---------------------------+--------------------------------------+
  | admin_state_up            | UP                                   |
  | availability_zone_hints   |                                      |
  | availability_zones        |                                      |
  | created_at                | 2018-04-01T09:14:41Z                 |
  | description               |                                      |
  | dns_domain                | None                                 |
  | id                        | a0fc23dd-f1a5-4e9b-9d58-ea63b30d076b |
  | ipv4_address_scope        | None                                 |
  | ipv6_address_scope        | None                                 |
  | is_default                | False                                |
  | is_vlan_transparent       | None                                 |
  | mtu                       | 1450                                 |
  | name                      | inside                               |
  | port_security_enabled     | True                                 |
  | project_id                | 9d390c83cc4e46c7a40167dee68075f0     |
  | provider:network_type     | None                                 |
  | provider:physical_network | None                                 |
  | provider:segmentation_id  | None                                 |
  | qos_policy_id             | None                                 |
  | revision_number           | 2                                    |
  | router:external           | Internal                             |
  | segments                  | None                                 |
  | shared                    | False                                |
  | status                    | ACTIVE                               |
  | subnets                   |                                      |
  | tags                      |                                      |
  | updated_at                | 2018-04-01T09:14:41Z                 |
  +---------------------------+--------------------------------------+
Next we will create new subnets. Before that, let us list down the existing subnets for reference.
stack@openstack-instance-2:~/devstack$ openstack subnet list -f yaml
- ID: 244ed014-8b9f-4e4d-ab12-9931ecec4238
  Name: private-subnet
  Network: 2ebe2084-6dae-40dd-8704-7954944238d7
  Subnet: 10.0.0.0/26
- ID: 265de598-d881-4d58-a185-1a69be39b2fd
  Name: ipv6-private-subnet
  Network: 2ebe2084-6dae-40dd-8704-7954944238d7
  Subnet: fd7b:34b0:9a57::/64
Create a new subnet within the network. We will call it net-01 and assign a subnet range of 10.1.1.0/24
  stack@openstack-instance-2:~/devstack$ openstack subnet create net-01 --network inside --subnet-range 10.1.1.0/24
  +-------------------+--------------------------------------+
  | Field             | Value                                |
  +-------------------+--------------------------------------+
  | allocation_pools  | 10.1.1.2-10.1.1.254                  |
  | cidr              | 10.1.1.0/24                          |
  | created_at        | 2018-04-01T09:20:13Z                 |
  | description       |                                      |
  | dns_nameservers   |                                      |
  | enable_dhcp       | True                                 |
  | gateway_ip        | 10.1.1.1                             |
  | host_routes       |                                      |
  | id                | 0317aa4a-84d3-44df-8781-3f04d558a473 |
  | ip_version        | 4                                    |
  | ipv6_address_mode | None                                 |
  | ipv6_ra_mode      | None                                 |
  | name              | net-01                               |
  | network_id        | a0fc23dd-f1a5-4e9b-9d58-ea63b30d076b |
  | project_id        | 9d390c83cc4e46c7a40167dee68075f0     |
  | revision_number   | 0                                    |
  | segment_id        | None                                 |
  | service_types     |                                      |
  | subnetpool_id     | None                                 |
  | tags              |                                      |
  | updated_at        | 2018-04-01T09:20:13Z                 |
  +-------------------+--------------------------------------+
As mentioned earlier, the relation between subnet and network is many-to-one. So we can create another subnet net-02 within the same inside network.
  stack@openstack-instance-2:~/devstack$ openstack subnet create net-02 --network inside --subnet-range 10.1.2.0/24
  +-------------------+--------------------------------------+
  | Field             | Value                                |
  +-------------------+--------------------------------------+
  | allocation_pools  | 10.1.2.2-10.1.2.254                  |
  | cidr              | 10.1.2.0/24                          |
  | created_at        | 2018-04-01T09:21:07Z                 |
  | description       |                                      |
  | dns_nameservers   |                                      |
  | enable_dhcp       | True                                 |
  | gateway_ip        | 10.1.2.1                             |
  | host_routes       |                                      |
  | id                | 6e5f2220-29da-4679-962f-22934f2c3d49 |
  | ip_version        | 4                                    |
  | ipv6_address_mode | None                                 |
  | ipv6_ra_mode      | None                                 |
  | name              | net-02                               |
  | network_id        | a0fc23dd-f1a5-4e9b-9d58-ea63b30d076b |
  | project_id        | 9d390c83cc4e46c7a40167dee68075f0     |
  | revision_number   | 0                                    |
  | segment_id        | None                                 |
  | service_types     |                                      |
  | subnetpool_id     | None                                 |
  | tags              |                                      |
  | updated_at        | 2018-04-01T09:21:07Z                 |
  +-------------------+--------------------------------------+
Creating nova compute instances
We need to know the image names available before creating an instance. List the images available.
  stack@openstack-instance-2:~/devstack$ openstack image list -f yaml
  - ID: 2a5fbb6b-b694-4f76-ac19-4af358d1c7e8
    Name: cirros-0.3.5-x86_64-disk
    Status: active
Cirros is a tiny image available as part of devstack, useful for testing purpose. Let us create two instances under inside network running cirros image.
  stack@openstack-instance-2:~/devstack$ openstack server create /
  --flavor m1.tiny --image cirros-0.3.5-x86_64-disk --network inside host --min 2 --max 2
  +-----------------------------+-----------------------------------------------------------------+
  | Field                       | Value                                                           |
  +-----------------------------+-----------------------------------------------------------------+
  | OS-DCF:diskConfig           | MANUAL                                                          |
  | OS-EXT-AZ:availability_zone |                                                                 |
  | OS-EXT-STS:power_state      | NOSTATE                                                         |
  | OS-EXT-STS:task_state       | scheduling                                                      |
  | OS-EXT-STS:vm_state         | building                                                        |
  | OS-SRV-USG:launched_at      | None                                                            |
  | OS-SRV-USG:terminated_at    | None                                                            |
  | accessIPv4                  |                                                                 |
  | accessIPv6                  |                                                                 |
  | addresses                   |                                                                 |
  | adminPass                   | odJy58yPdHnz                                                    |
  | config_drive                |                                                                 |
  | created                     | 2018-04-01T09:25:55Z                                            |
  | flavor                      | m1.tiny (1)                                                     |
  | hostId                      |                                                                 |
  | id                          | dbda4926-4ca6-40be-b673-d0c811ae43c2                            |
  | image                       | cirros-0.3.5-x86_64-disk (2a5fbb6b-b694-4f76-ac19-4af358d1c7e8) |
  | key_name                    | None                                                            |
  | name                        | host-1                                                          |
  | progress                    | 0                                                               |
  | project_id                  | 9d390c83cc4e46c7a40167dee68075f0                                |
  | properties                  |                                                                 |
  | security_groups             | name='default'                                                  |
  | status                      | BUILD                                                           |
  | updated                     | 2018-04-01T09:25:55Z                                            |
  | user_id                     | dfd4e794f59f48549016de1263c30dbb                                |
  | volumes_attached            |                                                                 |
  +-----------------------------+-----------------------------------------------------------------+
Either min or max parameter is necessary. or else server build fails miserably with no clue as to what went wrong.
Note that in the above command we specified only the network and not subnet. But this network has two subnets. So let us see which subnet is chosen to run the nova compute instances.
  stack@openstack-instance-2:~/devstack$ openstack server list -f yaml
  - Flavor: m1.tiny
    ID: 5ea3d968-aa29-4911-b658-e0b6498b09f4
    Image: cirros-0.3.5-x86_64-disk
    Name: host-2
    Networks: inside=10.1.1.9
    Status: ACTIVE
  - Flavor: m1.tiny
    ID: dbda4926-4ca6-40be-b673-d0c811ae43c2
    Image: cirros-0.3.5-x86_64-disk
    Name: host-1
    Networks: inside=10.1.1.10
    Status: ACTIVE
It turns out the first subnet net-01 we created is being used. But if we want to specify net-02 for instance creation, it is more tricky. We need to create a port in that subnet and attach its nic during instance creation.
  stack@openstack-instance-2:~/devstack$ openstack port create \
  --network a0fc23dd-f1a5-4e9b-9d58-ea63b30d076b --fixed-ip subnet=6e5f2220-29da-4679-962f-22934f2c3d49 if-host-02
  +-----------------------+-------------------------------------------------------------------------+
  | Field                 | Value                                                                   |
  +-----------------------+-------------------------------------------------------------------------+
  | admin_state_up        | UP                                                                      |
  | allowed_address_pairs |                                                                         |
  | binding_host_id       | None                                                                    |
  | binding_profile       | None                                                                    |
  | binding_vif_details   | None                                                                    |
  | binding_vif_type      | None                                                                    |
  | binding_vnic_type     | normal                                                                  |
  | created_at            | 2018-04-01T09:32:31Z                                                    |
  | data_plane_status     | None                                                                    |
  | description           |                                                                         |
  | device_id             |                                                                         |
  | device_owner          |                                                                         |
  | dns_assignment        | None                                                                    |
  | dns_domain            | None                                                                    |
  | dns_name              | None                                                                    |
  | extra_dhcp_opts       |                                                                         |
  | fixed_ips             | ip_address='10.1.2.5', subnet_id='6e5f2220-29da-4679-962f-22934f2c3d49' |
  | id                    | 2b9635bf-8f93-4663-9c6d-f40f0492195c                                    |
  | ip_address            | None                                                                    |
  | mac_address           | fa:16:3e:40:08:73                                                       |
  | name                  | if-host-02                                                              |
  | network_id            | a0fc23dd-f1a5-4e9b-9d58-ea63b30d076b                                    |
  | option_name           | None                                                                    |
  | option_value          | None                                                                    |
  | port_security_enabled | True                                                                    |
  | project_id            | 9d390c83cc4e46c7a40167dee68075f0                                        |
  | qos_policy_id         | None                                                                    |
  | revision_number       | 6                                                                       |
  | security_group_ids    | bd41b78c-974c-4854-b808-dec11575964b                                    |
  | status                | DOWN                                                                    |
  | subnet_id             | None                                                                    |
  | tags                  |                                                                         |
  | trunk_details         | None                                                                    |
  | updated_at            | 2018-04-01T09:32:31Z                                                    |
  +-----------------------+-------------------------------------------------------------------------+
Now create an instance in this subnet. Use the port id from above output to specify the nic.
  stack@openstack-instance-2:~/devstack$ openstack server create --flavor m1.tiny \
  --image cirros-0.3.5-x86_64-disk --nic port-id=2b9635bf-8f93-4663-9c6d-f40f0492195c  host-3 --max 1
  +-----------------------------+-----------------------------------------------------------------+
  | Field                       | Value                                                           |
  +-----------------------------+-----------------------------------------------------------------+
  | OS-DCF:diskConfig           | MANUAL                                                          |
  | OS-EXT-AZ:availability_zone |                                                                 |
  | OS-EXT-STS:power_state      | NOSTATE                                                         |
  | OS-EXT-STS:task_state       | scheduling                                                      |
  | OS-EXT-STS:vm_state         | building                                                        |
  | OS-SRV-USG:launched_at      | None                                                            |
  | OS-SRV-USG:terminated_at    | None                                                            |
  | accessIPv4                  |                                                                 |
  | accessIPv6                  |                                                                 |
  | addresses                   |                                                                 |
  | adminPass                   | hnN294KgUTrY                                                    |
  | config_drive                |                                                                 |
  | created                     | 2018-04-01T09:52:23Z                                            |
  | flavor                      | m1.tiny (1)                                                     |
  | hostId                      |                                                                 |
  | id                          | 376c3d59-f74c-4b3b-a4c7-5b9fb9d3eef7                            |
  | image                       | cirros-0.3.5-x86_64-disk (2a5fbb6b-b694-4f76-ac19-4af358d1c7e8) |
  | key_name                    | None                                                            |
  | name                        | host-3                                                          |
  | progress                    | 0                                                               |
  | project_id                  | 9d390c83cc4e46c7a40167dee68075f0                                |
  | properties                  |                                                                 |
  | security_groups             | name='default'                                                  |
  | status                      | BUILD                                                           |
  | updated                     | 2018-04-01T09:52:23Z                                            |
  | user_id                     | dfd4e794f59f48549016de1263c30dbb                                |
  | volumes_attached            |                                                                 |
  +-----------------------------+-----------------------------------------------------------------+
Before we move on to next section, let us check the server instances we have created so far.
  stack@openstack-instance-2:~/devstack$ openstack server list -f yaml
  - Flavor: m1.tiny
    ID: 376c3d59-f74c-4b3b-a4c7-5b9fb9d3eef7
    Image: cirros-0.3.5-x86_64-disk
    Name: host-3
    Networks: inside=10.1.2.5
    Status: ACTIVE
  - Flavor: m1.tiny
    ID: 5ea3d968-aa29-4911-b658-e0b6498b09f4
    Image: cirros-0.3.5-x86_64-disk
    Name: host-2
    Networks: inside=10.1.1.9
    Status: ACTIVE
  - Flavor: m1.tiny
    ID: dbda4926-4ca6-40be-b673-d0c811ae43c2
    Image: cirros-0.3.5-x86_64-disk
    Name: host-1
    Networks: inside=10.1.1.10
    Status: ACTIVE
Neutron networking between hosts
Let us see the subnet membership of each ports.
  stack@openstack-instance-2:~/devstack$ openstack port list -f yaml --fixed-ip subnet=net-01
  - Fixed IP Addresses: 'ip_address=''10.1.1.2'', subnet_id=''0317aa4a-84d3-44df-8781-3f04d558a473''

      ip_address=''10.1.2.2'', subnet_id=''6e5f2220-29da-4679-962f-22934f2c3d49'''
    ID: 6764de9f-deec-494b-a9b4-0903bfbfefea
    MAC Address: fa:16:3e:8f:47:41
    Name: ''
    Status: ACTIVE
  - Fixed IP Addresses: ip_address='10.1.1.9', subnet_id='0317aa4a-84d3-44df-8781-3f04d558a473'
    ID: ab283b4a-5738-48c9-8a53-343a1e5c795d
    MAC Address: fa:16:3e:9d:b6:7f
    Name: ''
    Status: ACTIVE
  - Fixed IP Addresses: ip_address='10.1.1.10', subnet_id='0317aa4a-84d3-44df-8781-3f04d558a473'
    ID: de7ee5de-e694-4ff3-9763-d7fb86e0038c
    MAC Address: fa:16:3e:7a:ce:84
    Name: ''
    Status: ACTIVE

  stack@openstack-instance-2:~/devstack$ openstack port list -f yaml --fixed-ip subnet=net-02
  - Fixed IP Addresses: ip_address='10.1.2.5', subnet_id='6e5f2220-29da-4679-962f-22934f2c3d49'
    ID: 2b9635bf-8f93-4663-9c6d-f40f0492195c
    MAC Address: fa:16:3e:40:08:73
    Name: if-host-02
    Status: ACTIVE
  - Fixed IP Addresses: 'ip_address=''10.1.1.2'', subnet_id=''0317aa4a-84d3-44df-8781-3f04d558a473''

      ip_address=''10.1.2.2'', subnet_id=''6e5f2220-29da-4679-962f-22934f2c3d49'''
    ID: 6764de9f-deec-494b-a9b4-0903bfbfefea
    MAC Address: fa:16:3e:8f:47:41
    Name: ''
    Status: ACTIVE
We can see that one port appears in both the subnets (MAC address: fa:16:3e:8f:47:41). This is the default DNS server of the network and gets attached to the subnet automatically unless we explicitly specify otherwise.
To test connectivity we need to console in to the hosts. We will use virsh to console in to the instances. First let us list the hosts.
  stack@openstack-instance-2:~/devstack$ sudo virsh list
   Id    Name                           State
  ----------------------------------------------------
   1     instance-00000001              running
   2     instance-00000002              running
   3     instance-00000003              running
Console to the first instance host-1.
  stack@openstack-instance-2:~/devstack$ sudo virsh console 1
  Connected to domain instance-00000001
  Escape character is ^]

  login as 'cirros' user. default password: 'cubswin:)'. use 'sudo' for root.
  cirros login: cirros
  Password:
  $ ip add | grep 'inet.*10'
      inet 10.1.1.10/24 brd 10.1.1.255 scope global eth0
  $ sudo hostname cirros-1-1-1-10
  $ export PS1="\h$ "
We will see that this host can talk to other host host-2 within the same subnet.
cirros-1-1-1-10$ ping 10.1.1.9
PING 10.1.1.9 (10.1.1.9): 56 data bytes
64 bytes from 10.1.1.9: seq=0 ttl=64 time=4.409 ms
64 bytes from 10.1.1.9: seq=1 ttl=64 time=1.070 ms
64 bytes from 10.1.1.9: seq=2 ttl=64 time=1.437 ms

--- 10.1.1.9 ping statistics ---
3 packets transmitted, 3 packets received, 0% packet loss
round-trip min/avg/max = 1.070/2.305/4.409 ms
But it cannot reach host-3 which is a different subnet (net-02)
cirros-1-1-1-10$ ping 10.1.2.5
PING 10.1.2.5 (10.1.2.5): 56 data bytes

--- 10.1.2.5 ping statistics ---
3 packets transmitted, 0 packets received, 100% packet loss
Likewise, the host cannot reach external network such as internet.
cirros-1-1-1-10$ ping 8.8.8.8
PING 8.8.8.8 (8.8.8.8): 56 data bytes

--- 8.8.8.8 ping statistics ---
3 packets transmitted, 0 packets received, 100% packet loss
Like in any tradional network, we need a router to allow traffic between different subnets. OpenStack Neutron provides a software defined router which can attach to multiple subnets and provide the same functionality.
Let us go ahead and create a router.
stack@openstack-instance-2:~/devstack$ openstack router create demo_router
+-------------------------+--------------------------------------+
| Field                   | Value                                |
+-------------------------+--------------------------------------+
| admin_state_up          | UP                                   |
| availability_zone_hints |                                      |
| availability_zones      |                                      |
| created_at              | 2018-04-02T00:14:29Z                 |
| description             |                                      |
| distributed             | False                                |
| external_gateway_info   | None                                 |
| flavor_id               | None                                 |
| ha                      | False                                |
| id                      | f36a24b0-e4a3-41de-9fdd-73f85df9dbaa |
| name                    | demo_router                          |
| project_id              | 9d390c83cc4e46c7a40167dee68075f0     |
| revision_number         | 1                                    |
| routes                  |                                      |
| status                  | ACTIVE                               |
| tags                    |                                      |
| updated_at              | 2018-04-02T00:14:29Z                 |
+-------------------------+--------------------------------------+
List the routers visible to validate the result. You can see an existing pre-built router and the one we created just now.
  stack@openstack-instance-2:~/devstack$ openstack router list -f yaml
  - Distributed: false
    HA: false
    ID: 58cc905f-4c8b-4641-ba92-a1a491d818ab
    Name: router1
    Project: 9d390c83cc4e46c7a40167dee68075f0
    State: UP
    Status: ACTIVE
  - Distributed: false
    HA: false
    ID: f36a24b0-e4a3-41de-9fdd-73f85df9dbaa
    Name: demo_router
    Project: 9d390c83cc4e46c7a40167dee68075f0
    State: UP
    Status: ACTIVE
Now we will attach our subnets to the router.
  stack@openstack-instance-2:~/devstack$ openstack router add subnet demo_router net-01
  stack@openstack-instance-2:~/devstack$ openstack router add subnet demo_router net-02
You can see one new port from each subnet getting attached to the router.
 stack@openstack-instance-2:~/devstack$ openstack port list -f yaml --router demo_router
 - Fixed IP Addresses: ip_address='10.1.1.1', subnet_id='0317aa4a-84d3-44df-8781-3f04d558a473'
   ID: 468ff846-fb1d-4ef2-85b0-3957885c59a8
   MAC Address: fa:16:3e:b1:31:fa
   Name: ''
   Status: ACTIVE
 - Fixed IP Addresses: ip_address='10.1.2.1', subnet_id='6e5f2220-29da-4679-962f-22934f2c3d49'
   ID: ee15064b-26f2-46ae-bc09-02db440edd3b
   MAC Address: fa:16:3e:7c:62:28
   Name: ''
   Status: ACTIVE
To reduce the output I have filtered the port list with an argument –router
. Most list commands have ability to filter output like this. Use the interactive help menu to figure out the filter options.
Let us try to reach the host on the other network.
  cirros-1-1-1-10$ ping 10.1.2.5
  PING 10.1.2.5 (10.1.2.5): 56 data bytes
  64 bytes from 10.1.2.5: seq=0 ttl=63 time=4.141 ms
  64 bytes from 10.1.2.5: seq=1 ttl=63 time=1.499 ms

  --- 10.1.2.5 ping statistics ---
  2 packets transmitted, 2 packets received, 0% packet loss
  round-trip min/avg/max = 1.499/2.820/4.141 ms
Success! As expected, the host is one hop away.
  cirros-1-1-1-10$ traceroute 10.1.2.5
  traceroute to 10.1.2.5 (10.1.2.5), 30 hops max, 46 byte packets
   1  host-10-1-1-1.openstacklocal (10.1.1.1)  2.217 ms  0.360 ms  0.301 ms
   2  host-10-1-2-5.openstacklocal (10.1.2.5)  1.568 ms  1.155 ms  0.803 ms
But the outside world connection is not ready yet. For that we need to attach it to a public network. Recall that there was a pre-built public network as part of devstack setup. We will use this network to communicate to outside world.
  stack@openstack-instance-2:~/devstack$ openstack router set --external-gateway public demo_router
  stack@openstack-instance-2:~/devstack$ openstack router show demo_router -f yaml
  admin_state_up: UP
  availability_zone_hints: ''
  availability_zones: nova
  created_at: '2018-04-02T00:14:29Z'
  description: ''
  distributed: false
  external_gateway_info: '{"network_id": "1fe4e71c-d94e-400c-bcee-8067b621c827", "enable_snat":
    true, "external_fixed_ips": [{"subnet_id": "c0718110-7493-46bf-ba48-720762e47934",
    "ip_address": "172.24.4.3"}, {"subnet_id": "fab15575-ae4f-4528-bf0d-ac40d2000484",
    "ip_address": "2001:db8::6"}]}'
  flavor_id: null
  ha: false
  id: f36a24b0-e4a3-41de-9fdd-73f85df9dbaa
  interfaces_info: '[{"subnet_id": "0317aa4a-84d3-44df-8781-3f04d558a473", "ip_address":
    "10.1.1.1", "port_id": "468ff846-fb1d-4ef2-85b0-3957885c59a8"}, {"subnet_id": "6e5f2220-29da-4679-962f-22934f2c3d49",
    "ip_address": "10.1.2.1", "port_id": "ee15064b-26f2-46ae-bc09-02db440edd3b"}]'
  name: demo_router
  project_id: 9d390c83cc4e46c7a40167dee68075f0
  revision_number: 5
  routes: ''
  status: ACTIVE
  tags: ''
  updated_at: '2018-04-02T00:32:54Z'
The show command is similar to list command, but can show more detailed information about a single resource. As expected, it requires an additional unique identifier argument to identify the resource which we want to display.
See that there is a new external_gateway_info section. Now let us try to reach the internet.
  stack@openstack-instance-2:~/devstack$ sudo virsh console 1
  Connected to domain instance-00000001
  Escape character is ^]

  cirros-1-1-1-10$ ping 8.8.8.8
  PING 8.8.8.8 (8.8.8.8): 56 data bytes
  64 bytes from 8.8.8.8: seq=0 ttl=50 time=7.129 ms
  64 bytes from 8.8.8.8: seq=1 ttl=51 time=1.483 ms
  64 bytes from 8.8.8.8: seq=2 ttl=51 time=1.137 ms

  --- 8.8.8.8 ping statistics ---
  3 packets transmitted, 3 packets received, 0% packet loss
  round-trip min/avg/max = 1.137/3.249/7.129 ms
Success! To see how this traffic reaches out to internet, we will do tcpdump on the hypervisor.
  stack@openstack-instance-2:~/ sudo tcpdump 'host 8.8.8.8' -X
  tcpdump: verbose output suppressed, use -v or -vv for full protocol decode
  listening on br-ex, link-type EN10MB (Ethernet), capture size 262144 bytes
  00:37:14.019550 IP 172.24.4.3 > google-public-dns-a.google.com: ICMP echo request, id 49153, seq 0, length 64
    0x0000:  4500 0054 0979 4000 3f01 7205 ac18 0403  E..T.y@.?.r.....
    0x0010:  0808 0808 0800 5076 c001 0000 73cd 73ba  ......Pv....s.s.
    0x0020:  0000 0000 0000 0000 0000 0000 0000 0000  ................
    0x0030:  0000 0000 0000 0000 0000 0000 0000 0000  ................
    0x0040:  0000 0000 0000 0000 0000 0000 0000 0000  ................
    0x0050:  0000 0000                                ....
  00:37:14.020493 IP google-public-dns-a.google.com > 172.24.4.3: ICMP echo reply, id 49153, seq 0, length 64
    0x0000:  4500 0054 0000 0000 3401 c67e 0808 0808  E..T....4..~....
    0x0010:  ac18 0403 0000 5876 c001 0000 73cd 73ba  ......Xv....s.s.
    0x0020:  0000 0000 0000 0000 0000 0000 0000 0000  ................
    0x0030:  0000 0000 0000 0000 0000 0000 0000 0000  ................
    0x0040:  0000 0000 0000 0000 0000 0000 0000 0000  ................
    0x0050:  0000 0000
The traffic from the host is being source NAT by the router to go out to the internet (recall from the earlier output that 172.24.4.3 belongs to the external gateway of the router). In traditional networking term this is called NAT overloading. This can provide only outbound connectivity for the host.
In order to provide inbound connectivity to the host, we need to create a floating ip. This is similar to elastic IP in AWS or staic NAT in traditional networking.
  stack@openstack-instance-2:~/devstack$ openstack floating ip create public
  +---------------------+--------------------------------------+
  | Field               | Value                                |
  +---------------------+--------------------------------------+
  | created_at          | 2018-04-02T00:44:14Z                 |
  | description         |                                      |
  | fixed_ip_address    | None                                 |
  | floating_ip_address | 172.24.4.5                           |
  | floating_network_id | 1fe4e71c-d94e-400c-bcee-8067b621c827 |
  | id                  | e2ff37e4-f8f5-4413-98aa-e0df516c1a3b |
  | name                | 172.24.4.5                           |
  | port_id             | None                                 |
  | project_id          | 9d390c83cc4e46c7a40167dee68075f0     |
  | qos_policy_id       | None                                 |
  | revision_number     | 0                                    |
  | router_id           | None                                 |
  | status              | DOWN                                 |
  | subnet_id           | None                                 |
  | tags                | []                                   |
  | updated_at          | 2018-04-02T00:44:14Z                 |
  +---------------------+--------------------------------------+
Attach this to our host-1 instance. You can now see the floating IP also listed in the openstack server list output.
  stack@openstack-instance-2:~/devstack$ openstack server add floating ip host-1 172.24.4.5
  stack@openstack-instance-2:~/devstack$ openstack server list --name host-1 -f yaml
  - Flavor: m1.tiny
    ID: dbda4926-4ca6-40be-b673-d0c811ae43c2
    Image: cirros-0.3.5-x86_64-disk
    Name: host-1
    Networks: inside=10.1.1.10, 172.24.4.5
    Status: ACTIVE
Here you can see the floating ip is mapped to our port-id.
  stack@openstack-instance-2:~/devstack$ openstack floating ip show 172.24.4.5
  +---------------------+--------------------------------------+
  | Field               | Value                                |
  +---------------------+--------------------------------------+
  | created_at          | 2018-04-02T00:44:14Z                 |
  | description         |                                      |
  | fixed_ip_address    | 10.1.1.10                            |
  | floating_ip_address | 172.24.4.5                           |
  | floating_network_id | 1fe4e71c-d94e-400c-bcee-8067b621c827 |
  | id                  | e2ff37e4-f8f5-4413-98aa-e0df516c1a3b |
  | name                | 172.24.4.5                           |
  | port_id             | de7ee5de-e694-4ff3-9763-d7fb86e0038c |
  | project_id          | 9d390c83cc4e46c7a40167dee68075f0     |
  | qos_policy_id       | None                                 |
  | revision_number     | 2                                    |
  | router_id           | f36a24b0-e4a3-41de-9fdd-73f85df9dbaa |
  | status              | ACTIVE                               |
  | subnet_id           | None                                 |
  | tags                | []                                   |
  | updated_at          | 2018-04-02T00:47:14Z                 |
  +---------------------+--------------------------------------+
We require one last step to initiate inbound connections to the host. Recall that each ports are assigned with a security group. Since this is an inbound connection, we need to explicitly permit access in security group.
Check the Security Group assigned to our port.
  stack@openstack-instance-2:~/devstack$ openstack port
    \show de7ee5de-e694-4ff3-9763-d7fb86e0038c -c 'security_group_ids' -f yaml
  security_group_ids: bd41b78c-974c-4854-b808-dec11575964b
Let us see the rules which are permitted by this security group.
  stack@openstack-instance-2:~/devstack$ openstack security group show bd41b78c-974c-4854-b808-dec11575964b  -f yaml
  created_at: '2018-04-01T09:01:20Z'
  description: Default security group
  id: bd41b78c-974c-4854-b808-dec11575964b
  name: default
  project_id: 9d390c83cc4e46c7a40167dee68075f0
  revision_number: 6
  rules: 'created_at=''2018-04-01T09:01:20Z'', direction=''ingress'', ethertype=''IPv4'',
    id=''2ab4f8a5-43ed-4f3e-8c43-cc854bc8feb3'', remote_group_id=''bd41b78c-974c-4854-b808-dec11575964b'',
    updated_at=''2018-04-01T09:01:20Z''

    created_at=''2018-04-01T09:01:20Z'', direction=''egress'', ethertype=''IPv6'', id=''5c33d0ac-8ee9-4bd7-951c-dca998931828'',
    updated_at=''2018-04-01T09:01:20Z''

    created_at=''2018-04-01T09:01:20Z'', direction=''ingress'', ethertype=''IPv6'',
    id=''d7c7a642-485b-482e-8d26-a958aaafa19e'', remote_group_id=''bd41b78c-974c-4854-b808-dec11575964b'',
    updated_at=''2018-04-01T09:01:20Z''

    created_at=''2018-04-01T09:01:20Z'', direction=''egress'', ethertype=''IPv4'', id=''f41405df-d0c9-4427-ba11-f0a26b025c3e'',
    updated_at=''2018-04-01T09:01:20Z'''
  tags: []
  updated_at: '2018-04-02T01:56:25Z'
Here you can see 4 rules, two each for IPv4 and IPv6. For egress rules, you can see that there is no remote prefix or group id configured. It means all outbound connections are permitted. For ingress traffic, you can see that the remote_group_id references to self. It means that all ports assigned to the same security group can send inbound traffic unhindered.
Let us add more rules to permit ICMP and SSH
  stack@openstack-instance-2:~/devstack$ openstack security group rule create \
  --protocol icmp --ingress --remote-ip 0.0.0.0/0 default
  +-------------------+--------------------------------------+
  | Field             | Value                                |
  +-------------------+--------------------------------------+
  | created_at        | 2018-04-02T01:54:12Z                 |
  | description       |                                      |
  | direction         | ingress                              |
  | ether_type        | IPv4                                 |
  | id                | df23fec9-b87a-47ef-8f38-67472de46071 |
  | name              | None                                 |
  | port_range_max    | None                                 |
  | port_range_min    | None                                 |
  | project_id        | 9d390c83cc4e46c7a40167dee68075f0     |
  | protocol          | icmp                                 |
  | remote_group_id   | None                                 |
  | remote_ip_prefix  | 0.0.0.0/0                            |
  | revision_number   | 0                                    |
  | security_group_id | bd41b78c-974c-4854-b808-dec11575964b |
  | updated_at        | 2018-04-02T01:54:12Z                 |
  +-------------------+--------------------------------------+

  stack@openstack-instance-2:~/devstack$ openstack security group rule create \
  --protocol tcp --dst-port 22 --ingress --remote-ip 0.0.0.0/0 default
  +-------------------+--------------------------------------+
  | Field             | Value                                |
  +-------------------+--------------------------------------+
  | created_at        | 2018-04-02T01:56:25Z                 |
  | description       |                                      |
  | direction         | ingress                              |
  | ether_type        | IPv4                                 |
  | id                | adee3f3f-a5a0-497f-a12d-644e64c7015e |
  | name              | None                                 |
  | port_range_max    | 22                                   |
  | port_range_min    | 22                                   |
  | project_id        | 9d390c83cc4e46c7a40167dee68075f0     |
  | protocol          | tcp                                  |
  | remote_group_id   | None                                 |
  | remote_ip_prefix  | 0.0.0.0/0                            |
  | revision_number   | 0                                    |
  | security_group_id | bd41b78c-974c-4854-b808-dec11575964b |
  | updated_at        | 2018-04-02T01:56:25Z                 |
  +-------------------+--------------------------------------+
Note that I am using the security group name
defaultas argument instead of security group id. As with most other arguments, we can use either name or the id. We can find the name from the output of previous show command.
Now you can see 2 new rules added to the group
  stack@openstack-instance-2:~/devstack$ openstack security group rule list -c 'IP Protocol' -c 'IP Range' -c 'Port Range' -f yaml
  - IP Protocol: null
    IP Range: null
    Port Range: ''
  - IP Protocol: null
    IP Range: null
    Port Range: ''
  - IP Protocol: tcp
    IP Range: 0.0.0.0/0
    Port Range: '22:22'
  - IP Protocol: null
    IP Range: null
    Port Range: ''
  - IP Protocol: icmp
    IP Range: 0.0.0.0/0
    Port Range: ''
  - IP Protocol: null
    IP Range: null
    Port Range: ''
Note that in the previous list command output, there were lot of fields. Here I have used -c argument to select the interesting fields. To select multiple columns, we have to repeat this -c argument.
Now we can initiate SSH and ICMP connections to this VM host using floating ip address.
  stack@openstack-instance-2:~/devstack$ ping 172.24.4.5
  PING 172.24.4.5 (172.24.4.5) 56(84) bytes of data.
  64 bytes from 172.24.4.5: icmp_seq=1 ttl=63 time=0.628 ms
  64 bytes from 172.24.4.5: icmp_seq=2 ttl=63 time=0.529 ms
  ^C
  --- 172.24.4.5 ping statistics ---
  2 packets transmitted, 2 received, 0% packet loss, time 1003ms
  rtt min/avg/max/mdev = 0.529/0.578/0.628/0.055 ms
  stack@openstack-instance-2:~/devstack$ ssh cirros@172.24.4.5
  cirros@172.24.4.5's password:
  cirros-1-1-1-10$
Recall that the hosts were able to ping each other even before we updated the security group. It is because all the ports were assigned to the default security group and hosts on security group can talk to each other by virtue of an implicit rule.
Conclusion
I have barely scratched the surface of things possible with Openstack. However, this post should give a good idea about the general command structure and operation procedures in Openstack. For further learning, dig around the official documentation (pay attention to openstack version in the docs, there can be major differences between each versions) or setup a lab environment and play around.
On the Neutron front, there are a lot of topics to explore such as ML2 network types, virtual switch types, L3 agents etc., Redhat’s official documentation provides a good introduction to many of these components.